7th Grade Unit 1 Guide (Open Up Resources)
I have taught both 7th and 8th graders using Open Up Resources (OUR) and after unit 1 students come away feeling very differently about their math performance. My 8th graders feel empowered and ready for the next unit whereas my 7th graders feel discouraged and are wary of the next unit. Apparently I am not alone as over the past few years, I’ve noticed many teachers who have similar experiences asking for help in the Open Up Resources Grade 7 Facebook group. Here are quotes from a search I did for the phrase “unit 1” in the Facebook group:


So what’s going on? Open Up Resources starts the first unit in all grades 6-8 with geometry, presumably because it is widely considered to be the friendliest math topic and thus is intended to start the students off on the right foot. This actually does happen with 8th grade. The students love it and it really builds up their confidence. The main difference that I can see is the background knowledge students are expected to have to be successful in 8th grade unit 1 (transformations) is minimal. Students mostly need to understand the different ways shapes can move in a plane and also the names for various polygons. 7th grade unit 1 on the other hand requires students to come in with substantial background knowledge from several different grade levels in order to be successful.
If you haven’t already noticed, the OUR community is incredibly supportive and whenever someone asks for help, there are usually lots of people who step in to help. Here is a summary of some very good suggestions from teachers in the same Facebook group that I compiled:


Here are some strategies that expand upon the above quotes that will help you and your students get through Unit 1 hopefully feeling good and ready to take on the next unit:
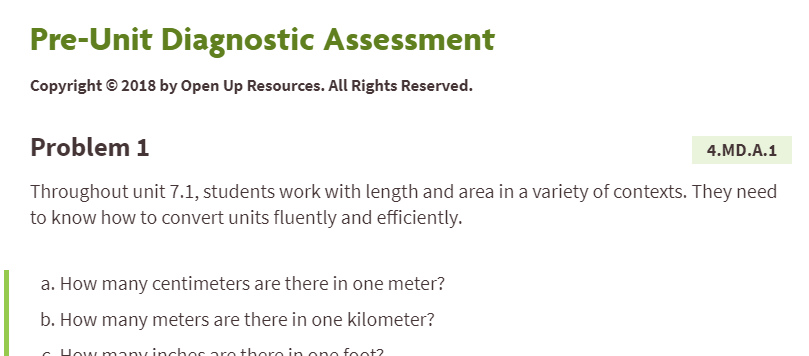
Administer the OUR Pre-Assessment
Of course just because many students struggle mightily with unit 1, it does not mean that your students will also struggle at the same level. A great starting point to gather data I highly recommend for every unit is the OUR pre-assessment. The pre-assessment is designed to inform you of your students readiness and is mostly composed of standards from previous grade levels which you can find on the top right hand corner of each question.
This data should be compiled and used to make important instructional decisions. For example, I use the data to create seating charts for each unit to ensure groups have a good mix of high, medium, and low students. As you probably already know, a student can come in very low but still be very strong in a particular math strand. Many times students in my class who struggle with one unit excel in the next. Use this to your advantage to leverage your students’ math skills and affirm their math identities. The pre-assessment data is also a good indicator of how heavily I will have to differentiate for my students.
Understand the Prerequisite Standards Very Well
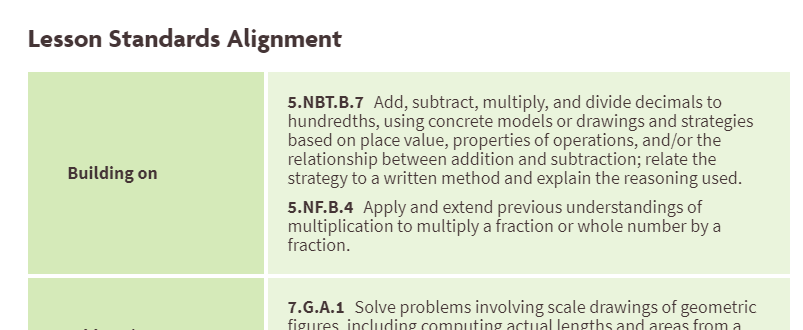
One of the most powerful things you can do is take the time to deeply understand the standards from previous grade levels each lesson is based on. This information can be found in the “building on” row in the “Lesson Standards Alignment” section in each OUR lesson:
To save time, I’ve made a table that shows which standards are prerequisites for each lesson here:
| Lesson # | Building On |
|---|---|
| Lesson 1 - Scale Drawings | knowledge of vocabulary such as skewed, stretched, squished, proportional to describe drawings. |
| Lesson 2 Corresponding Parts and Scale Factors | 5.NBT.B.7Add, subtract, multiply, and divide decimals to hundredths, using concrete models or drawings and strategies based on place value, properties of operations, and/or the relationship between addition and subtraction; relate the strategy to a written method and explain the reasoning used. 5.NF.B.4Apply and extend previous understandings of multiplication to multiply a fraction or whole number by a fraction. |
| Lesson 3 Making Scaled Copies | 6.NS.B.3Fluently add, subtract, multiply, and divide multi-digit decimals using the standard algorithm for each operation. |
| Lesson 4 Scaled Relationships | corresponding angles, measuring angles with a protractor, angle naming conventions, line segment naming conventions |
| Lesson 5 The Size of the Scale Factor | 5.NBT.B.6Find whole-number quotients of whole numbers with up to four-digit dividends and two-digit divisors, using strategies based on place value, the properties of operations, and/or the relationship between multiplication and division. Illustrate and explain the calculation by using equations, rectangular arrays, and/or area models. 5.NF.B.4Apply and extend previous understandings of multiplication to multiply a fraction or whole number by a fraction. 5.NF.B.5Interpret multiplication as scaling (resizing), by: 6.NS.A.1Interpret and compute quotients of fractions, and solve word problems involving division of fractions by fractions, e.g., by using visual fraction models and equations to represent the problem. |
| Lesson 6 Scaling and Area | 6.G.A.1Find the area of right triangles, other triangles, special quadrilaterals, and polygons by composing into rectangles or decomposing into triangles and other shapes; apply these techniques in the context of solving real-world and mathematical problems. |
| Lesson 7 Scale Drawings | in, ft, cm, and m lengths in relation to each other |
| Lesson 8 Scale Drawings and Maps | 6.NS.B.2Fluently divide multi-digit numbers using the standard algorithm. 6.RP.A.3.bSolve unit rate problems including those involving unit pricing and constant speed. |
| Lesson 9 Creating Scale Drawings | 3.NF.A.3Explain equivalence of fractions in special cases, and compare fractions by reasoning about their size. 5.NBT.A.3Read, write, and compare decimals to thousandths. |
| Lesson 10 Changing Scales in Scale Drawings | 2.MD.AMeasure and estimate lengths in standard units. 6.G.A.1Find the area of right triangles, other triangles, special quadrilaterals, and polygons by composing into rectangles or decomposing into triangles and other shapes; apply these techniques in the context of solving real-world and mathematical problems. |
| Lesson 11 Scales without Units | measuring in cm units |
| Lesson 12 Units in Scale Drawings | 6.RP.A.3.dUse ratio reasoning to convert measurement units; manipulate and transform units appropriately when multiplying or dividing quantities. |
| Lesson 13 Draw It to Scale | creating a floorplan |
Take Time to Review Prerequisite Standards in Class
Now this one can be done in many different ways. Sara Van Der Werf for example creates “green sheets” which “is one sheet of paper reviewing mathematical concepts, connected to current learning, for students to use.” Sara gives these green sheets out at the beginning of each unit and very clearly states that she spends a maximum of one period for students to review them.
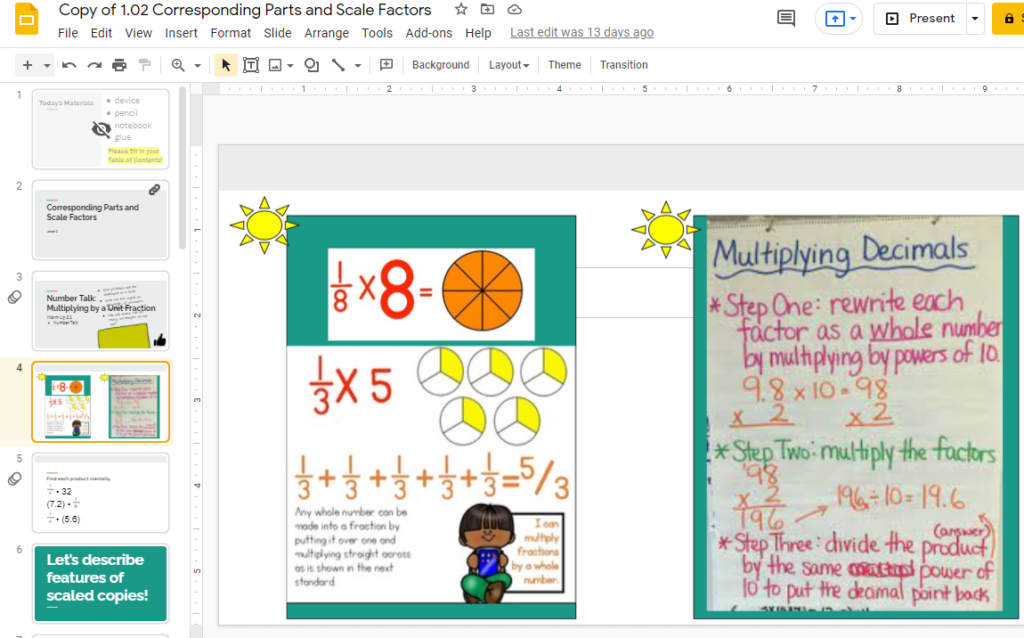
I plan on doing something very similar this school year which I am calling “digital anchor charts” for now. In this example, I have modified Morgan Stipe’s original google slides to include two images that will support students as they work through the lesson. In the warm up for lesson 2, students are asked to multiply fractions. I plan to take 5 minutes max walking students through the image on the left and then leave it projected as students work on their warmup. In the third activity of this lesson students need to multiply decimals so I will do the same short review with the image on the right and leave it projected while students work.
These are just two examples that can work to help you support your students access the concepts in unit 1 but the key to implement them effectively is to monitor how much class time is devoted to review. If you are spending much more than one class period each unit on review of non-grade level standards it becomes a rigor and equity issue. The majority of our class time should be devoted to grade-level standards otherwise we are doing our students a disservice. The best way to avoid spending too much class time on review is to assign it for homework or work with school staff to ensure students are reviewing these standards in intervention and/or after school classes.
Reframe Multiplication as a Scalar
I’m often surprised by how difficult it is for students to understand the concept of a scale factor. Undoubtedly one reason why students struggle with this unit is because the scale factor is a very new way of thinking about multiplication that many likely have not encountered before. Many students learn multiplication as repeated addition but when dealing with scale copies, that definition does not apply. In this unit, we need to make sure we are clear that when we are multiplying, we are using a scalar that either increases or decreases the sizes of the shapes we are working with and that students have sufficient time to understand this concept. They probably need more time than you think.
Adjust the Pacing
One thing I noticed about this unit is that it transitions from one concept to another relatively quickly. For example, in lesson 2 activity 3: Scaled Triangles, the students are given this problem:
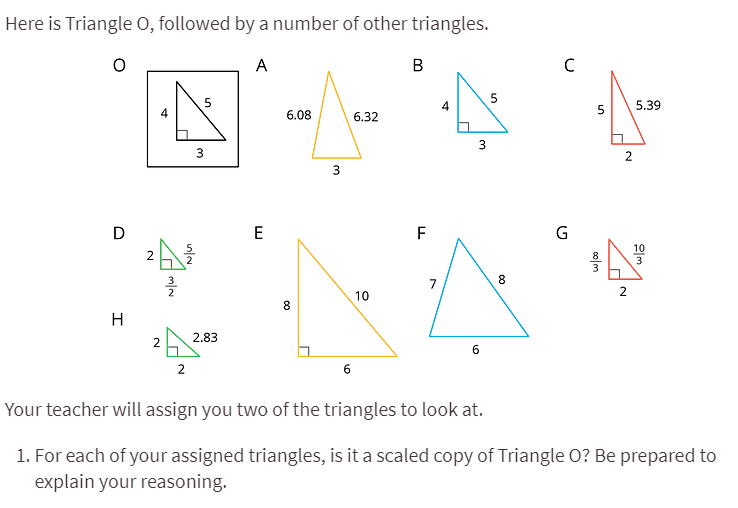
This is the first and last time students are asked to identify scale factors (lesson 1 is devoted to building the conceptual foundation and the defining of a scale factor) before they are asked to create their own in lesson 3. It might be useful to adjust your pacing so that students have more time to identify scale factors before they are asked to create their own in lesson 3. One other important feature to notice in the activity above is that it is asking students to find scale factors while also multiplying decimals, multiplying fractions, and keeping track of corresponding sides. That is four distinct skills that could be challenging for some students to synthesize within the allotted time so keeping the numbers simple could be a good strategy to use here. Or you may decide that you need to devote more than the recommended 15 minutes on this activity so you might need to reduce the amount of time spent elsewhere.
Many teachers actively adjust the pacing of OUR units due to bell schedules and other factors. This is a task best accomplished in collaboration with other teachers. If you have nobody else to collaborate with, it would be a good idea to network with other OUR teachers on this because it is likely too daunting of a task to be done alone.
Summary
OUR 7th Grade Unit 1 has proven to be challenging for many teachers and students and the best strategy is to be as prepared as possible. I hope these strategies have helped you think about how you can support your students throughout this unit. Please share your own strategies that have worked for you!